
December 10, 2014
Christmas Necklace
I am pleased to share a detailed photo and the updated version of a necklace recently featured in Somerset's Holidays and Celebrations, adding the NEW Tim Holtz idea-ology Adornments - Tidings Tokens, Numbers filled with Stickle colors and the Snowflake with a bit of red Stickle. Please enjoy and start your own yearly edition to a holiday wearable. Happy Holidays always! K


December 8, 2014
Wallflower Jewelry
I am pleased to share two of my jewelry pieces featuring Tim Holtz Wallflower papers in the latest edition of Belle Armoire Jewelry released on December 1st by Stampington & Company:

.jpg)


I have always been intrigued by shadowboxes, especially really small ones that would be appropriate for jewelry pieces - thus - a Tim Holtz idea-ology watch body or the Spellbinders "A Gilded Life" series that was introduced this past year is perfect for using small prints and those in back of a paper stash pack. I was inspired by a sample in his 2014 CHA booth and look forward to working with the new 2015 papers as well.
Begin with the watch body, remove the metal backing plate to use only as a pattern, then lay the open part of watch on a sheet of plain paper and draw a pattern around the outside edge - remove pattern and save to use in later step. With open side of watch down, center, stack and glue (as shown in photo below) three gear parts to glass and metal watch frame using Ranger glossy accents or a good jewelry glue to secure - dry flat. TIP - when gluing jewelry parts together, use only a LITTLE BIT of adhesive as too much will run out from the edges and look messy - if this happens, use your finger nail & soft cloth (old T-shirt) to clean up immediately as later chipping off dry adhesive from glass & metal is risky.
Using the metal watch back as a pattern, select and cut a paper circle to fit inside the watch body, sign and date the back before placing against the glass, you may also wish to distress ink the edges. Secure the background paper circle with tiny dots of glossy accents around the inside of the watch - it is best not to glue paper against the glass backing as it will create a mess - trust me on that one! Select two or three of the same small paper print to cut apart for your scene inside the watch. Fussy cut apart and separate the paper print - in this case the flowers and leaves - shape the paper using rounded cuticle stick or simply your fingers - glue only center or end parts of the back of the shaped prints into the watch body on top of the background print with glossy accents OR a heavy bodied paper glue - dry flat. TIP - before gluing in the paper parts, use Tim Holtz Distress ink markers to colorize the edges, creating illusion of reality and "covering" the white edges of the paper - it really does make a difference in the appearance of the project - try it on a scrap piece.
Tiny rhinestones were added to the flower centers - you can find the small ones on "blinged" alphabet sheets, pick them off the backing and color with alcohol inks to match paper prints then glue into the flower centers with Ranger glossy accents - dry flat. When interior is dry, reshape paper pieces as desired.
To enclose, cover and protect the contents of the shadowbox, use your paper pattern to cut a piece of heavy plastic (Bazzill plastic paper) to cover the open area - use glossy accents around the top edge of the watch body frame to secure - dry. The scalloped framed accent covering top edge is made using Ranger Sticky Back Foil sheets, cut to width of 1/2" then trimmed on one edge with small scallop decorative scissors - remove paper backing and gently work around the frame edge - 1/2 of the foil covers the plastic edge and the other half goes onto the watch body. After secure, use a bit of Black Soot Distress paint on your finger, smear over the foil to dull and grey to match watch color - wipe off excess - dry.
Colorize metal adornments or charms with alcohol inks - dry - attach to the gear parts with jump rings. NOTE - the heart and type charms have been "filled" with a piece of the same small print paper in the Wallflower paper pad. The small metal piece of a flower adornment actually broke off a larger piece I had already colored, so I glued it on top of the heart charm. I used two link chains for the necklace with stations of colored crystals, add your closure and you are done:
The Wallflower bird necklace also uses small paper prints in the back of the pad, match size to the piece you are working on. The beauty of using the Spellbinders frames is having their exact matching dies to cut the background papers AND included clear top to drop on and finish the enclosure.
Instructions for this piece are basically identical to those above, however, I added real bird feathers under the layers of the wings to enhance and a dot of glossy accents to their eyes. The butterfly has been glued in the center to the very top and alcohol ink colored rhinestones have been added to the outside frame.
I do hope you have enjoyed these selections and will comment on the blog and share this site.
Thanks so much for stopping by - see you soon with some new holiday goodies! K
November 7, 2014
CC3C Challenge 14 - Colored Crackle
Tis the season for awe inspiring photographs of fall foliage as it turns brilliant shades of color. Although I grew up close to the Smokey Mountains, some of the most magnificent photos are part of the Grand Canyon featured here. This challenge offered new opportunities to use the Bigz Tattered Leaves die and the NEW Layered Leaf die with texture fade. Once again we thank our hosts and sponsors - including this special challenge contributor, the Funkie Junkie Boutique at www.thefunkiejunkie.com.

This heavy chipboard piece measures 5 7/8" x 10 3/4" and is die cut using the Cameo Frame approximately one inch from the center top. After cutting, coat the frame surface with Rock Candy Distress Crackle Paint and allow to dry and crack thoroughly - I usually leave it overnight. When dry, GENTLY pounce (you don't want to pull up the crackle "tiles") Distress Paint colors over the surface, misting and blending with water if needed - Mustard Seed, Rusty Hinge and Barn Door - dry thoroughly but carefully with a heat tool - if the "tiles" get too hot, they will curl and pull up off the background.
Now daub on Vintage Photo Distress Stain to seep into the cracks and blot with a paper towel to be sure the surface color will remain strong - dry thoroughly. I feel strongly that the next step is important in any crackle finish to insure the cracked "tiles" stay in place and do not chip off with age or while completing the project.
 here you can see where the Glue-n-Seal has been applied (on the right) and literally pushed into the cracks - think of it as adding grout to tile - dry - use Vintage Photo Distress Ink around the edges - dry and set the frame aside to rest.


The Word Band letters are "color filled" with Walnut Stain Distress Paint - wipe outside area clean - dry. Arrange and glue all onto the frame using Glossy Accents and/or hot glue gun. Note the leaves and greenery are curled and bent to create depth of design.

A second piece of light weight chipboard was cut 5 1/2" x 9 3/4" for the back of the frame - glue only on bottom and sides so a photograph can be inserted. Add any special personal touches, insert photo and enjoy during your fall celebrations.
Surfaces: Tim Holtz idea-ology Seasonal paper stash; Grungeboard; lightweight & heavyweight chipboard; Core'dinations cardstock
Dies: Sizzix - Cameo Frame, Tattered Leave, Layered Leaf, Tattered Pinecone
Distress Ink: Vintage Photo, Barn Door, Rusty Hinge
Distress Paint: Mustard Seed, Rusty Hinge, Barn Door, Metallic Bronze
Distress Stain: (Dauber or Spray) Mustard Seed, Spiced Marmalade, Peeled Paint, Barn Door, Frayed Burlap
Distress Ink Markers: Vintage Photo, Barn Door, Rusty Hinge
Mediums: Ranger Glossy Accents, Glue-n-Seal matte finish
Embellishments: Tim Holtz idea-ology Word Band, brads
Thanks so much for stopping by, please share this site with like minded souls and gentle spirits. I welcome your comments and look forward to hearing from you - best always! K
"Fall is Grand"
I chose to make a chipboard frame to crackle per Tim's instructions with Distress Paints, as well as a second technique for crackle that I used on the leaves with Distress Stains. This heavy chipboard piece measures 5 7/8" x 10 3/4" and is die cut using the Cameo Frame approximately one inch from the center top. After cutting, coat the frame surface with Rock Candy Distress Crackle Paint and allow to dry and crack thoroughly - I usually leave it overnight. When dry, GENTLY pounce (you don't want to pull up the crackle "tiles") Distress Paint colors over the surface, misting and blending with water if needed - Mustard Seed, Rusty Hinge and Barn Door - dry thoroughly but carefully with a heat tool - if the "tiles" get too hot, they will curl and pull up off the background.
Now daub on Vintage Photo Distress Stain to seep into the cracks and blot with a paper towel to be sure the surface color will remain strong - dry thoroughly. I feel strongly that the next step is important in any crackle finish to insure the cracked "tiles" stay in place and do not chip off with age or while completing the project.
Use a synthetic brush to coat the frame with Glue-n-Seal matte finish,
Cut fall leaves using the NEW Layered Leaf die and the Tattered Leaves die, out of Grungeboard NOT chipboard or cardboard (which will fold and break rather than bend and curl). Daub or spray on Distress Stain colors - Mustard Seed, Spiced Marmalade, Peeled Paint and Barn Door - blot if needed - while surface color is still damp, "flick" on a bit of Metallic Bronze Distress Paint and spritz on Distress Ink Markers - Barn Door and Peeled Paint - dry thoroughly - add more stain colors if needed or desired - dry. Here is a sampling of leaves with the bronze sheen and spritzed marker dots:
When the leaves are dry, coat them with Rock Candy Distress Crackle Paint and allow to dry and crack thoroughly. Daub on Frayed Burlap Distress Stain, blot - dry - repeat Glue-n-Seal process of sealing the cracks as above, then color the edges in Vintage Photo Distress Ink Marker. Emboss them ALL with the Layered Leaf Texture Fade that accompanies the die - place even the small leaves in the center of the embossing folder to create veining. You may also wish to add Vintage Photo Distress Ink, I however did not, but you can still see the embossed areas on the leaves.
Diecut the "Wood Rose" and greenery using Brushed Corduroy and Forest Moss Core-dinations textured cardstock with the Tattered Pinecone die and assemble the rose as per Tim's CC3C instructions on Page 65, Distress Ink the edges in Vintage Photo. Edge the greenery in Pine Needles Distress Ink and cut apart to use in smaller pieces around the leaves. The vintage post card is cut from Tim's 8x8 Seasonal paper stash with Vintage Photo Distress Ink Marker edging and spritz dots.
A second piece of light weight chipboard was cut 5 1/2" x 9 3/4" for the back of the frame - glue only on bottom and sides so a photograph can be inserted. Add any special personal touches, insert photo and enjoy during your fall celebrations.
Surfaces: Tim Holtz idea-ology Seasonal paper stash; Grungeboard; lightweight & heavyweight chipboard; Core'dinations cardstock
Dies: Sizzix - Cameo Frame, Tattered Leave, Layered Leaf, Tattered Pinecone
Distress Ink: Vintage Photo, Barn Door, Rusty Hinge
Distress Paint: Mustard Seed, Rusty Hinge, Barn Door, Metallic Bronze
Distress Stain: (Dauber or Spray) Mustard Seed, Spiced Marmalade, Peeled Paint, Barn Door, Frayed Burlap
Distress Ink Markers: Vintage Photo, Barn Door, Rusty Hinge
Mediums: Ranger Glossy Accents, Glue-n-Seal matte finish
Embellishments: Tim Holtz idea-ology Word Band, brads
Thanks so much for stopping by, please share this site with like minded souls and gentle spirits. I welcome your comments and look forward to hearing from you - best always! K
October 29, 2014
Halloween Hidden Album
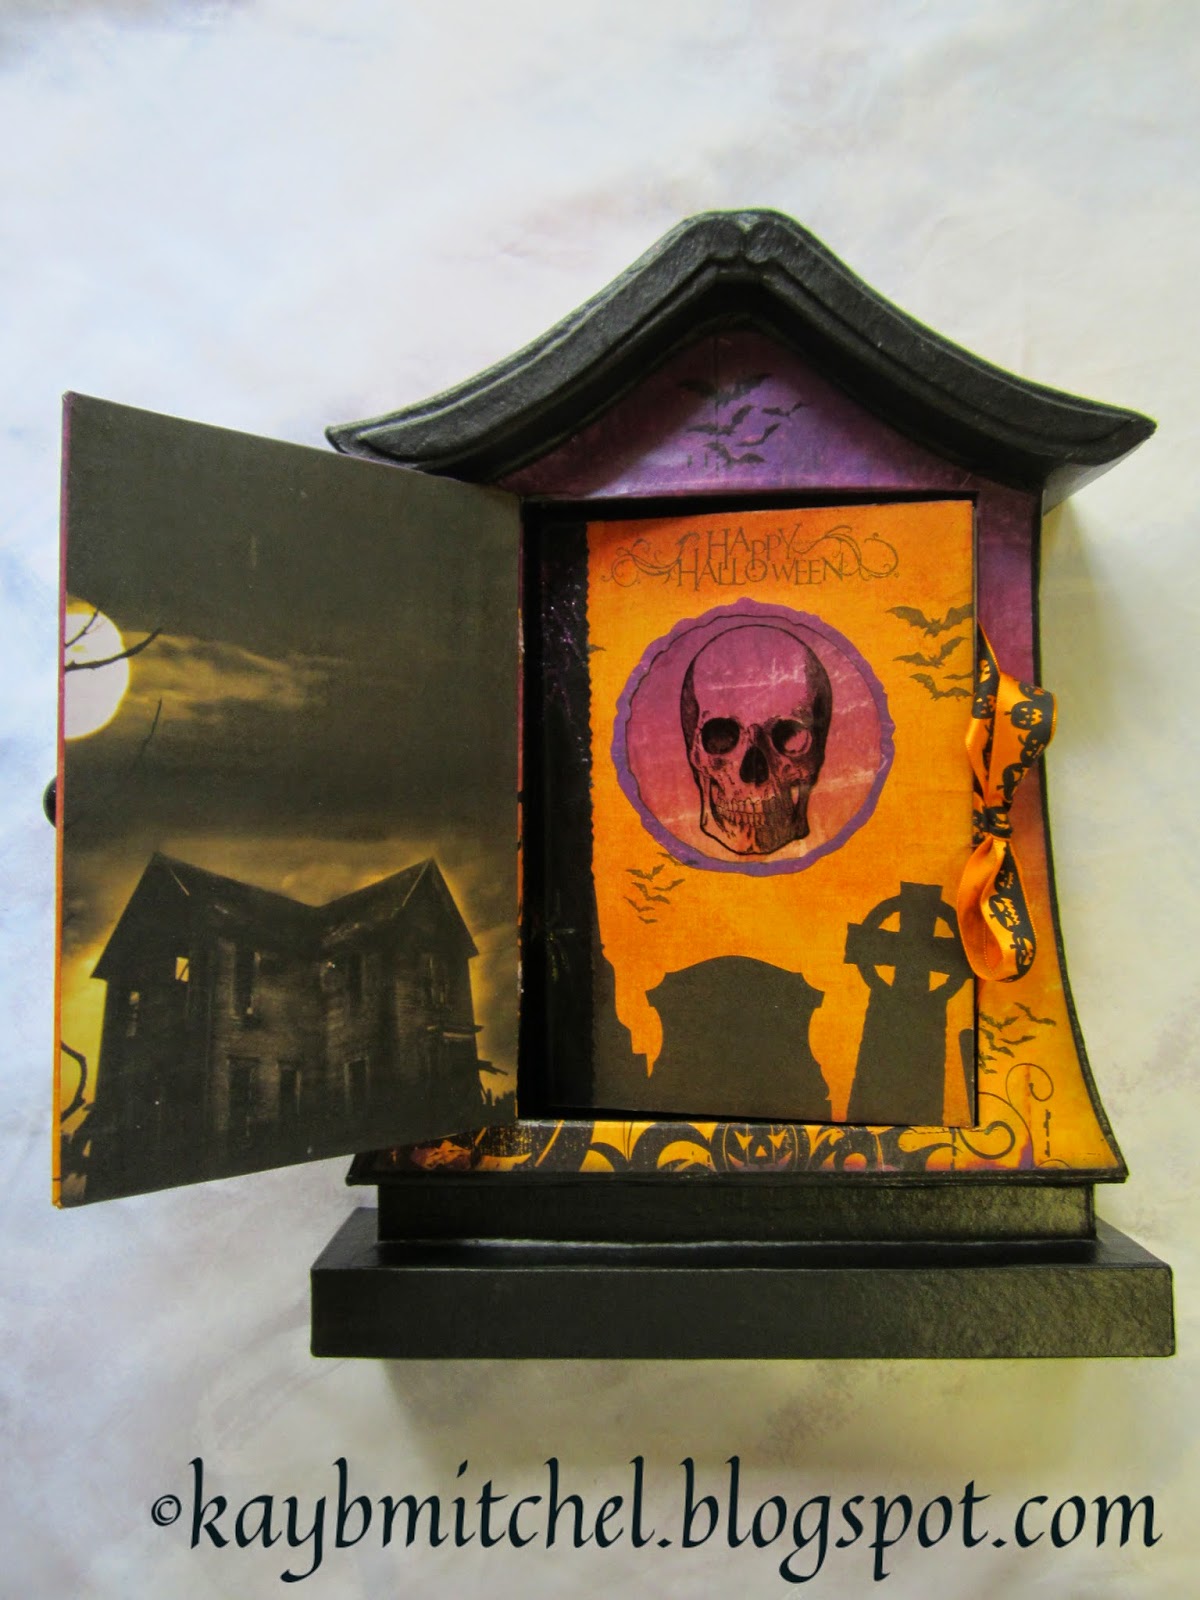
Hello all - I know many of you are busily preparing for the upcoming All Hallows Eve to enjoy with family and friends, I wanted to share a project "salvaged" from an after holiday sale bin, I found a battered paper mache tombstone (approx. 8" x 12") that needed its seams re-glued, but the all seeing creative eye visioned room for a album coming out of the center - sometimes we scare even ourselves. I plundered through my paper stash and found some really graphic designs that could be accented with additional stamp images and thus created this decor piece to hold trick-or-treat photos of grandchildren - have a safe and bootiful weekend!
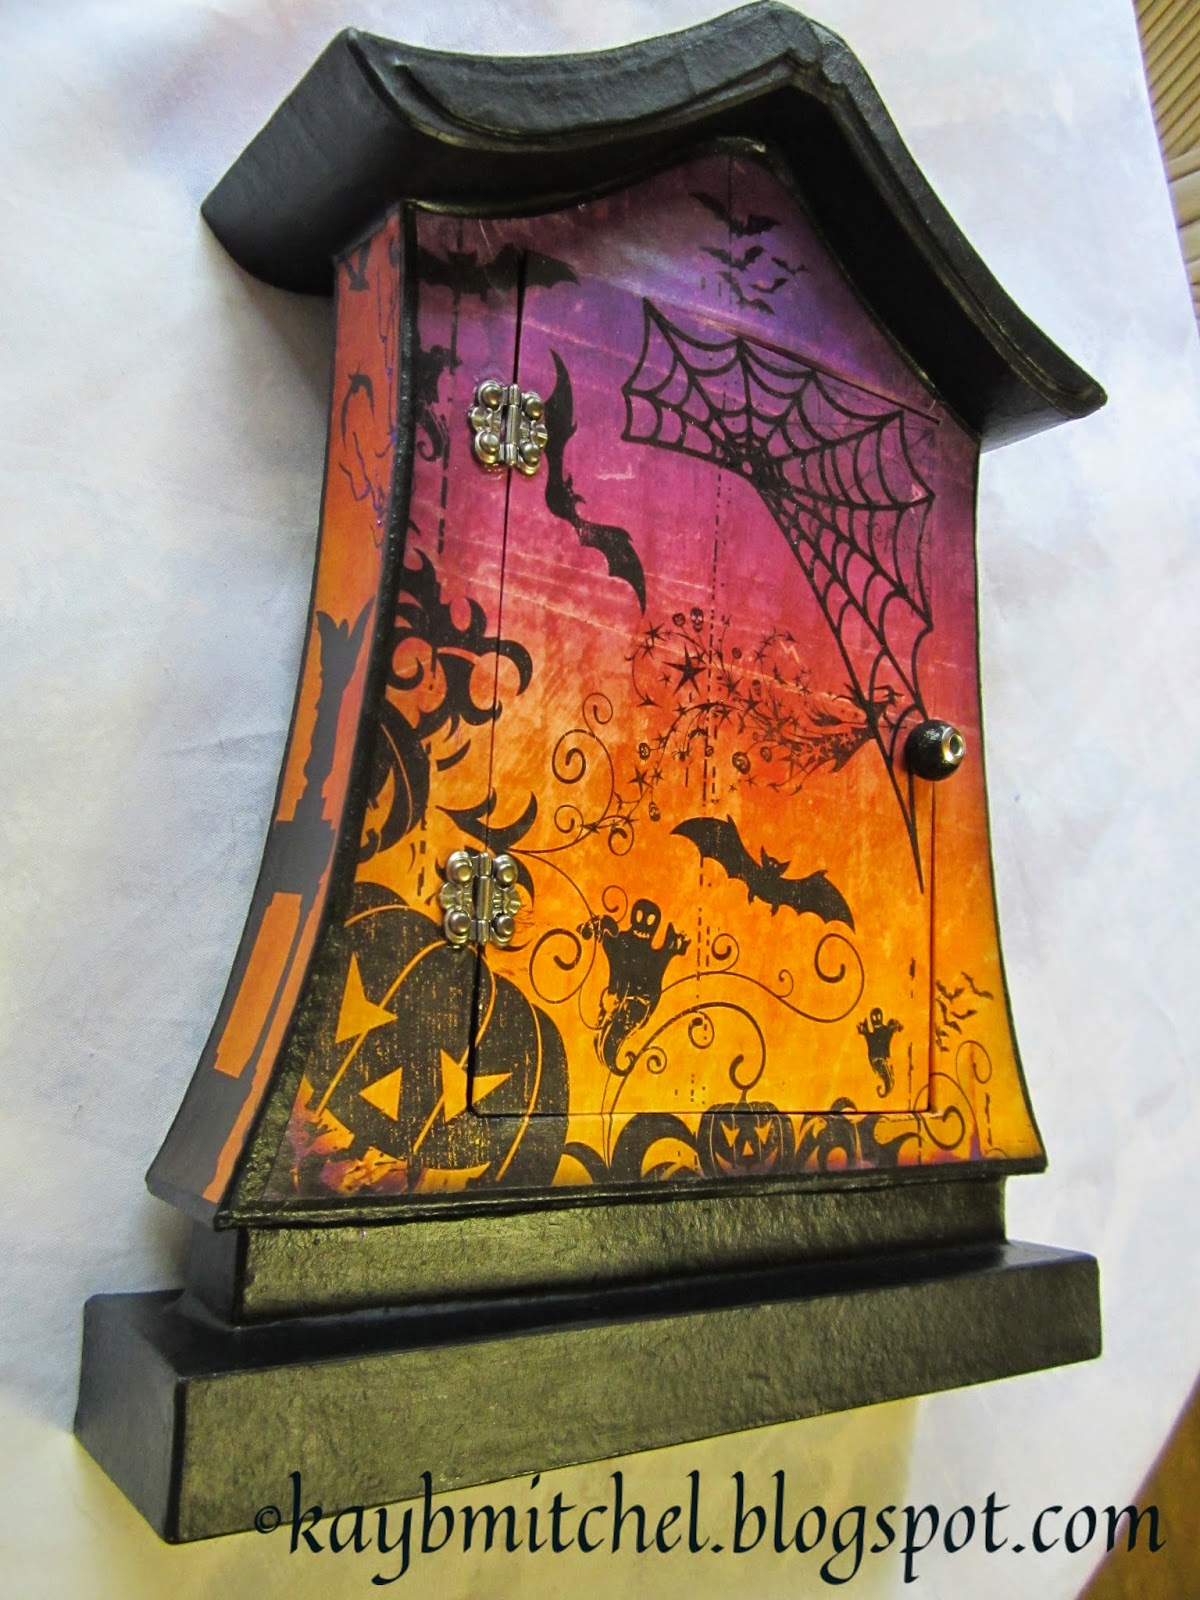
The REALLY proficient will figure out how to make one of these from scratch (lightweight chipboard and brown craft paper - use a hot glue gun and Ranger Glue-n-Seal to put together), however, you might find one on line or lurking around this weekend, waiting for you to purchase. Determine the size of front door you need, then use a SHARP craft knife and steel edge ruler to cut the door shape out of the front panel - if you mess this up, use a heavy piece of chipboard cut to replace the door (guess who did this!) You will also measure and cut four heavy chipboard pieces to form the inside "side panels" of the inner box area and glue them into place with either a hot glue gun or heavy paper adhesive (shown below) - dry - paint with Block Soot Distress Paint - dry.


The REALLY proficient will figure out how to make one of these from scratch (lightweight chipboard and brown craft paper - use a hot glue gun and Ranger Glue-n-Seal to put together), however, you might find one on line or lurking around this weekend, waiting for you to purchase. Determine the size of front door you need, then use a SHARP craft knife and steel edge ruler to cut the door shape out of the front panel - if you mess this up, use a heavy piece of chipboard cut to replace the door (guess who did this!) You will also measure and cut four heavy chipboard pieces to form the inside "side panels" of the inner box area and glue them into place with either a hot glue gun or heavy paper adhesive (shown below) - dry - paint with Block Soot Distress Paint - dry.
Determine the paper pieces you will use to cover all, then measure (roughly sketch) and cut - note the black base piece still shows on the edges so you do not have to be exact. I used two of the same papers for the front so I could wrap and glue the edges - both around the front door and into the sides of the box. If you only have one paper piece for the front, remember to separately cut-save-glue the piece that covers door so it will match the front of the box - dry. Add stamps, embossing or diecuts and seal - dry - add Stickle colors to accent printed images. Remember NOT to add a mat sealers over Stickles or it will take away the shine and bling! Glue on hinges and a large bracelet bead door knob using Glossy Accents.
The album is made using heavy double-sided scrapbook papers cut accordingly to the size you need - corner round the outside edges and Distress Ink as desired. The cover is made using a base piece of lightweight chipboard - the front paper has a circle cutout with stamped skeleton image protected by a piece of transparency sheet, glued at the edges into place. Add a ribbon tie glued between the chipboard and the first page. The rest of the pages are glued together back-to-back, several pages have a fold out glued between papers at the side seam. The last page is glued to the back cover of a second piece of lightweight chipboard - insert the second ribbon tie and glue between the paper and the board. Cover or paint the outside back of album. A "spine" piece of black cardstock has been added to the outside of the album to cover up the edges of the glued pages - voila - you're finished.
Your comments are always desired and appreciated - thanks for coming by! K
October 24, 2014
International Quilt Market
As a seamstress since the age of 10, at my Grandmothers knee making doll clothes, I am pleased to honor the International Quilt Market in session now in Houston, Texas. I too believe that many "crafters" would like to venture into the fabric and sewing side, so I combined the two processes in panels of Tim Holtz Eclectic Elements Fabrics by Coats AND Tim's many "idea-ology" metal embellishments by Advantus. These two pieces were recently featured in Somerset Haute Handbags - where you will find complete instructions and lots more detailed photographs - thanks for stopping by and enjoy! K


A close up for you:
A close up for you:
October 14, 2014
Fun with Wendy Vecchi
This past weekend at Pictures In Time in Fleming Island, Florida, many of us had the privilege of taking classes with Ranger Signature Designer, Wendy Vecchi - it was AWESOME! Her new inks, embossing powders, stamps & embossing paste are great and blend beautifully with other Ranger products, particularly those of Tim Holtz. Add this with her personal signature line of Art Parts and fun, easy, gorgeous techniques for your crafting and fine art projects. Here is but a small sample of what we worked with, please add Wendy to your "have to have" list, she can be reached at studio490art.blogspot.com or wbv1213@me.com.

We were a little tattered & tired but grateful to be sharing creativity and friendships - thank you Wendy!

October 9, 2014
CC3C Challenge 12 - Distress Photo Tinting
Hello again, I settled back into the studio for a few days this week to finish my offering of the latest Tim Holtz CC3C challenge, a multi-layer combination of several surfaces using the Wallflower paper stash. Thanks to Tim, Linda Ledbetter at Studio L3 and the Funkie Junkie Boutique for sponsoring a showcase of our creative endeavors - I hope you enjoy:
 My vision for this project was a little girl looking out a window into the backyard to see her siblings in the garden. I used the Found Relatives cards from both the original "deck" and the new Occasions edition. Photo tinting goes back generations and was first done with oil paints - one had to go to school to learn how - today using Tim's Distress Ink Markers to colorize, make it easy and fun!
To get started, trim cards (or photos) to desired shape and color to desired shades with ink markers. I used lighter shades on the big photo in the background and stronger color on the images in the foreground. OPTION - cut along the chin line of the larger photo, color the paper edge with the Pumice Stone ink marker and insert foam dots to elevate the face - why - I wanted allot of dimension on the overall project and this just "added to".
To prepare burlap panel, cut a piece of Wallflower vellum to fit top, then trim edges with deckle edge decorative scissors (or trimmer). To secure vellum to burlap without adhesive showing through or peeling back, I used a Xyron machine - peel and stick. I LOVE how the burlap shows through the vellum to give an extra dimensional layer. Use Distress Ink pads to rub and tint the burlap edges, matching ink colors to those found in the papers. This example is not the piece I used because the image was hidden too much so I saved it for another project another day - use one of the smaller prints:

.jpg) Measure window size and add 1/2" to all sides - cut out - score all sides at 1/4" and 1/2" - cut out corners. Turn cabinet card over to inside and place adhesive tape around opening - insert window and press to secure in place. Photo shows that tape can also be placed on the outside window edge and inserted into the card opening - either way works well.
Measure window size and add 1/2" to all sides - cut out - score all sides at 1/4" and 1/2" - cut out corners. Turn cabinet card over to inside and place adhesive tape around opening - insert window and press to secure in place. Photo shows that tape can also be placed on the outside window edge and inserted into the card opening - either way works well.
.jpg)


"In The Garden"
To get started, trim cards (or photos) to desired shape and color to desired shades with ink markers. I used lighter shades on the big photo in the background and stronger color on the images in the foreground. OPTION - cut along the chin line of the larger photo, color the paper edge with the Pumice Stone ink marker and insert foam dots to elevate the face - why - I wanted allot of dimension on the overall project and this just "added to".
To prepare burlap panel, cut a piece of Wallflower vellum to fit top, then trim edges with deckle edge decorative scissors (or trimmer). To secure vellum to burlap without adhesive showing through or peeling back, I used a Xyron machine - peel and stick. I LOVE how the burlap shows through the vellum to give an extra dimensional layer. Use Distress Ink pads to rub and tint the burlap edges, matching ink colors to those found in the papers. This example is not the piece I used because the image was hidden too much so I saved it for another project another day - use one of the smaller prints:
Now, carefully separate the cabinet card along the top and side seams with a craft knife - this will open up the card to insert the window. Use recycled packaging OR Bazzil Plastic Paper to cut and shape the window "box":
Prepare the garden flowers and greenery by "fussy" cutting flowers from both the Wallflower paper and vellum pads in the quarter page and smaller sizes. I also LOVE the way vellum flowers blended into the overall garden and accented the paper ones. I diecut Tim's Sizzlits Tapered Fringe (Core-dinations card stock) for grass and Spring Greenery; the Butterflies were cut from paper. I learned in my days of decoupage to color the edges of ALL paper cutouts with matching colors of ink markers to unify and blend - white edges are just not my thing and very distracting.
Measure matching paper piece to fit inside the cabinet card and attach large photo, flower, greenery and butterfly elements - use foam dots to elevate. Add a word band tied with inked crinkle ribbon (try the new Distress Stains to ink ribbons faster) and add heart charm to top - place inside the OPEN cabinet card then glue or tape the card top down on top and sides - use small binder clips to hold in place until the glue dries. Glue the finished cabinet card collage to the burlap panel:
Now position the smaller photo images and glue onto the background with foam dots - I use either Glossy Accents or a hot glue gun to do this - the "level" of this element should be as high as and rest on the window box corner. Arrange and glue on the remaining greenery, flowers and butterfly to finish.
The finished panel can be framed or a custom box made to fit and display.
SUPPLIES: (Thanks to Anna Karin for listing at each project - its a great idea I hope to remember.)
Surfaces: Tim Holtz idea-ology Wallflower paper stash, Wallflower Vellum stash, Bare Burlap panel, Core-dinations card stock
Dies: Sizzix Sizzlits - Spring Greenery, Tapered Fringe, Butterflies
Ink: Distress Ink - Worn Lipstick, Peeled Paint, Mustard Seed, Frayed Burlap, Vintage Photo
Ink Markers: Tattered Rose, Worn Lipstick, Shabby Shutters, Peeled Paint, Mustard Seed, Wild Honey, Pumice Stone
Adhesives & Mediums: Ranger Glossy Accents. Xyron for vellum, 1/4" Scor-Tape, Foam dots
Embellishments: Tim Holtz idea-ology Cabinet Card, Found Relatives cards, Adornment - Heart Charm, Word Band, Crinkle Ribbon
Many people have asked why I do so many projects in shadow boxes or "protected" elements - fact is - I have three beautiful cats who like to pick at and get into my projects so I try to protect them once they are finished. Thanks for coming by and following my work as it evolves, I hope you will share this site with like minded souls! Bye for now - K
Subscribe to:
Posts (Atom)